|
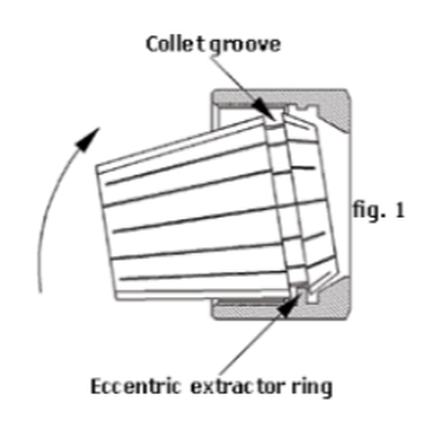
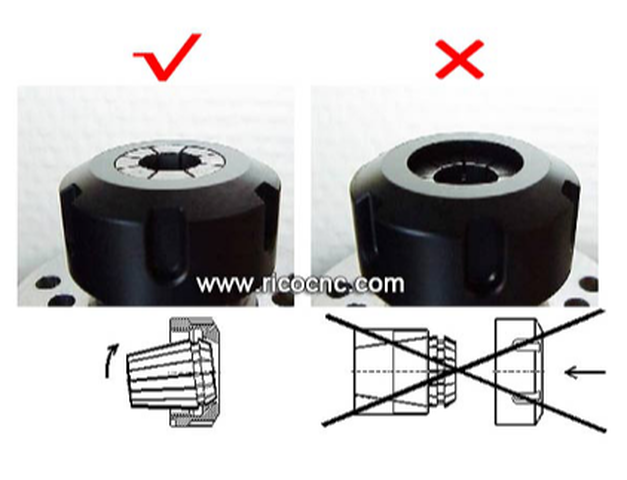
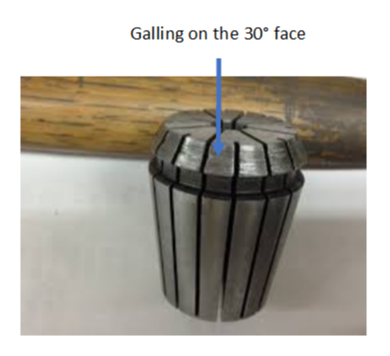
It is critical to properly assemble the collet and collet nut to avoid damage to the collet and make the most accurate and rigid assembly possible. The extraction groove of the collet must be properly seated to the extraction ring of the collet nut. If the collet extraction groove is not properly seated to the collet nut extraction ring, the collet will appear seated below the face of the nut. This typically occurs when the collet is placed in the collet pocket of the tool holder and then the nut is threaded on the tool holder. In a correct assembly, the collet will seat at the face of the collet nut. The image below shows a correct assembly on the left and an incorrect assembly on the right. DO NOT tighten the collet nut if the collet appears seated below the face of the nut as this will create galling on the 30° face of the collet. Galling appear as grooves or lines in the lead face of the collet. Recognize Galling on Your ER ColletGalling on the lead face of the collet can result in reduced clamping pressure on the cutting tool shank that may lead to the cutting tool slipping while cutting, or even tool breakage.
0 Comments
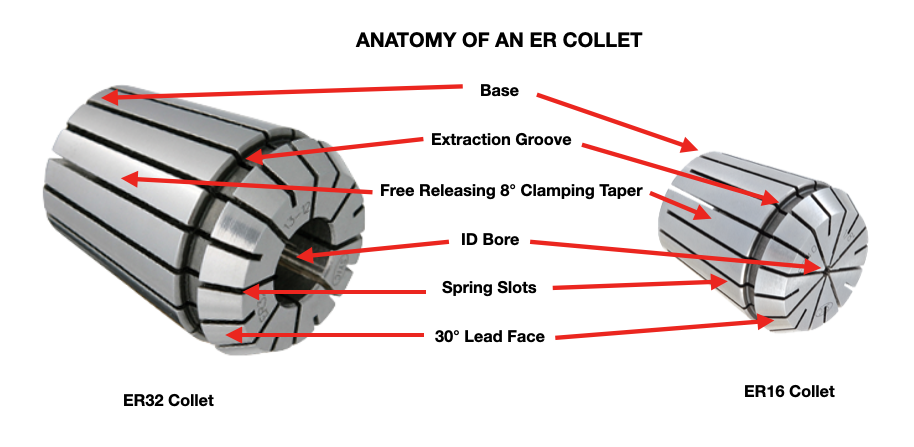
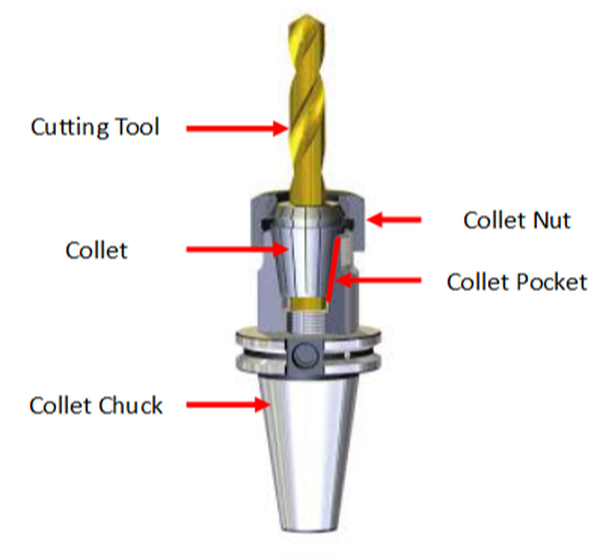
Edited by Bernard Martin If you work in the metalcutting, signmaking or cabinet making manufacturing industry, the term “collets” is already very familiar to you. There are many types of collets used in many different industries and applications. This article is focused on collets used in rotary tool holders found in CNC milling machining centers and CNC Routers and also used in CNC Lathes and Swiss Style CNC's. Let's cover the basics: What are Collets?Collets are the critical connection between the cutting tool and the tool holder, also called a collet chuck. Most collets are round, cone-shaped, and slotted. Collets encircle the cutting tool shank to evenly distribute holding power around its center bore. Before getting too deep into the technical aspect of collets, It's going to be helpful to anyone new to the use of collets to understand the basic anatomy of collets and of a collet chuck system. How Collets WorkThe tapered collet base is made to fit into the collet pocket of the collet chuck body. The free release locking tapered (16°included, 8° per side) design of the collet base and collet pocket allows the collet to be centered in the pocket as it is pushed in by the collet nut on the lead face during setup.
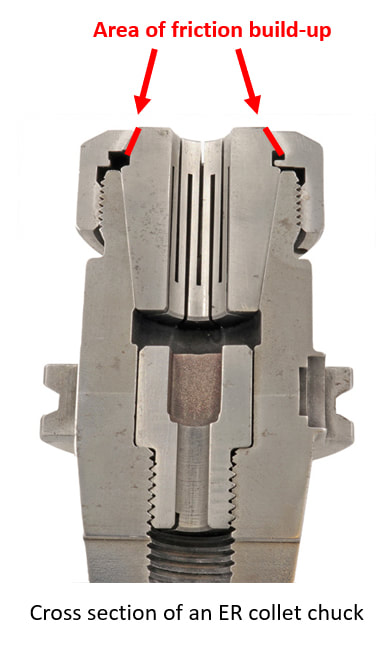
This centering effect enables the collet to achieve a high degree of accuracy (concentricity); much more than drill chucks and side-lock style end mill holders. As he collet nut is tightened down on the collet, it is pushed into the pocket collet chuck pocket. The slots in the collet allow the I.D. bore to collapse and apply clamping pressure to the cutting tool shank. It's essentially a spring that is compressed tight around the shank of the cutting tool such as a drill or end mill. The result is a very strong and rigid clamping force on the cutting tool. Since the collet base is tapered to match the collet pocket, tool runout (T.I.R.) is reduced. Total indicator runout (TIR) is a term often used in manufacturing, especially when dealing with rotating parts such as cutting tools, particularly endmills and drills. TIR is defined as the difference between the maximum and minimum values measured across an entire rotating surface about a reference axis. It’s been estimated that a tool with a run-out of 50% of the tool’s chip load will reduce its tool-life by 40%. That means that a 1/8” tool with a 0.00019” chip load per tooth will lose 40% of its tool-life with a run-out of less than 0.0001”. Excessive and inconsistent run-out from a properly setup ER collet chuck assembly typically occurs due to friction build-up between the 30° face of the collet and the collet nut.
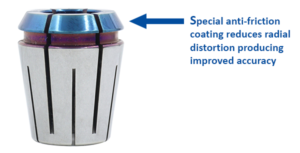 The result?
Other Parlec P3 collet advantages:
Don’t throw away you ER collet chucks to improve accuracy Try Parlec P3 collets and supercharge your ER collet system. The four critical requirements for tool holders are clamping force, concentricity, rigidity, and balance for high-spindle speeds. When these factors are dialed in just right, there’s nearly no chance of holder error and considerable cost reduction is achieved thanks to longer tool life and reduction of down-time due to tool changes. Easier said than done, our experts shared some of their best, quick-hitting advice for top tool holder performance in different situations. 1. Balance holders as a complete assembly Long-reach milling has some unique demands; when setting up this type of job, always balance tool holders as a complete assembly. While many tooling providers pre-balance their holders at the factory, it’s often inadequate, especially for long-reach applications. 2. Holder damage can go from bad to worse quickly Wear and tear on holders can be costly in the end, but there are ways to protect against it. Inspect and care for your holders. Trauma on a holder or spindle—dings, scratches, gouges, etc.—can magnify quickly. One bad holder can spread its problems like an illness. If you’re seeing disruptions like these on your holders, get them out of the rotation. 3. The rule of thumb on holder dimensions Looking for affordable ways to avoid vibration? Start by opting for a holder with a combination of the largest diameter and shortest length possible. 4. Rigidity can harm tapping operations What many don’t realize about tapping operations is that a perceived strength of collet chucks—their rigidity—can actually be detrimental. Rigidity does very little to counteract the dramatic thrust loads imposed on the tap and part, exacerbating the already difficult challenge of weathering the stop/reverse and maintaining synchronization. 5. Balancing is crucial to five-axis machining Five-axis machining introduces a whole new set of tooling challenges. While important in any type of machine, balance may be of most importance in full five-axis work. A well-balanced holder helps ensure the cutting edge of the end mill must be consistently engaged with the material in order to prevent chatter and poor surface finish quality. 6. Consider spindle speed requirements when choosing between shrink-fit and hydraulic holders If you have to choose between shrink-fit and hydraulic holders in a long-reach application, consider the spindle speed required. If a hydraulic chuck exceeds its rated RPM, fluid is pulled away from the holder’s internal gripping gland, causing loss of clamping force. But when used within its recommended operating range, a hydraulic tool holder offers superior runout and repeatability. On average, a good shrink-fit holder has about 0.0003-inch runout, while a hydraulic chuck offers 0.0001 inch or better. 7. Don’t overlook the tool’s effect on holder performance The cutting tool affects holding ability more than most machinists and engineers realize:
8. Not all dual-contact tooling is the same Anyone in the market for BIG-PLUS dual-contact tooling should consider this simple statement: Only a licensed supplier of BIG-PLUS has master gages that are traceable to the BIG grand master gages and have the dimensions and tolerances provided to make holders right. Everyone else is guessing and using a sample BIG-PLUS tool holder as their own master gage—a practice that any quality expert will advise against. Look for the marking: “BIG-PLUS Spindle System-License BIG DAISHOWA SEIKI.” 9. You may have a BIG-PLUS spindle and not even know it You’d be surprised how often we hear from our certified regrinders or engineers in the field about folks that didn’t realize their machine had a BIG-PLUS spindle—the message can get lost in the supply chain or during the sales process. The easiest way to know if an interface is BIG-PLUS is to place a standard tool into the spindle and see how much of a gap there is between the tool holder flange face and spindle face. Without BIG-PLUS, the standard gap should be visible, or about 0.12 in. If it is BIG-PLUS, the gap is half of this amount, or only 0.06 in. These values change depending on 30 taper, 40 taper or 50 taper sizes, but the gap is visibly less than usual. 10. Use positive offsets during holder setup It may be how it’s traditionally been done but touching off holder assemblies in each machine to establish negative tool offsets based on the zero-point surface—the vise, machine table, workpiece, etc.—is not the most efficient process. We think the choice is pretty clear: adapting machines to a single presetter so they can receive positive gage lengths is superior to using all types of machine-specific negative offsets.
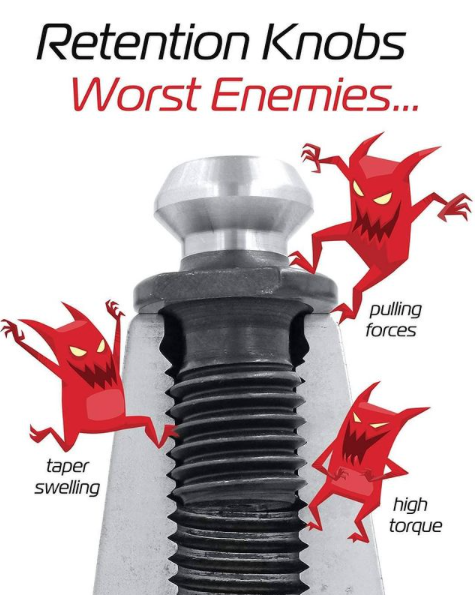
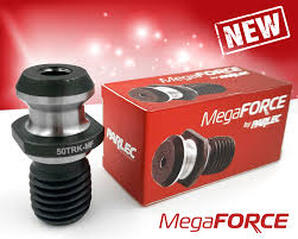
This is a change to “the way things have always been done” that can be met with some resistance, but in the grand scheme of things, it’s a relatively small and simple step that makes life much easier. It’s a relatively low-cost opportunity to introduce more standardization of holder setup to the shop floor. Holders are the bridge between the machine and the part. That’s a lot of pressure—literally and figuratively. It’s important to select, care for and use holders carefully from the day they are purchased until they’re tossed into the recycling bin. From collet chucks to coolant inducers, BIG KAISER is North America’s source for standard-bearing tool holders that guarantees high performance. Explore the full lineup. by Bernard Martin Retention Knobs are the critical connection between your machine tool and the tool holder and they are the only thing holding a steep taper tool holder in the machine’s spindle. Techniks has recently introduced their MegaFORCE retention knobs that have some rather unique features when compared to standard pull studs. Before delving into the features of the MegaFORCE pull studs, let's review some things that you may not know, or think about, on a daily basis. According to Haas, you should expect a service life of about 6000-8000 hours for a retention knob. Most all rotary toolholder manufacturers state that you should be replacing your pull studs at least every three years. However, if you're running multiple shifts, 24-7, making lots of tool changes, making very heavy cuts with long reach or heavy cutting tools, and/or have ball lock style grippers instead of collet type grippers used on the retention knob, you will probably need to replace your studs at least every six months. Given the spindle speeds that we are running at to remain competitive, retention knobs are not an item that you want to take a chance on breaking. I can tell you firsthand that 5 pound toolholder with a drill in it flying out of the spindle at 23,000 RPM is not something you want to experience. METAL FATIGUE: WHY THEY FAILPull studs encounter catastrophic failure as a result of metal fatigue. The metal fatigue can be caused by a number of reasons including poor choice of base material, engineering design, machining process, poor heat treatment, and, sometimes, they have just met or exceeded their service life. We're going to dig into each of these reasons below but first let's look at some threading fundamentals.
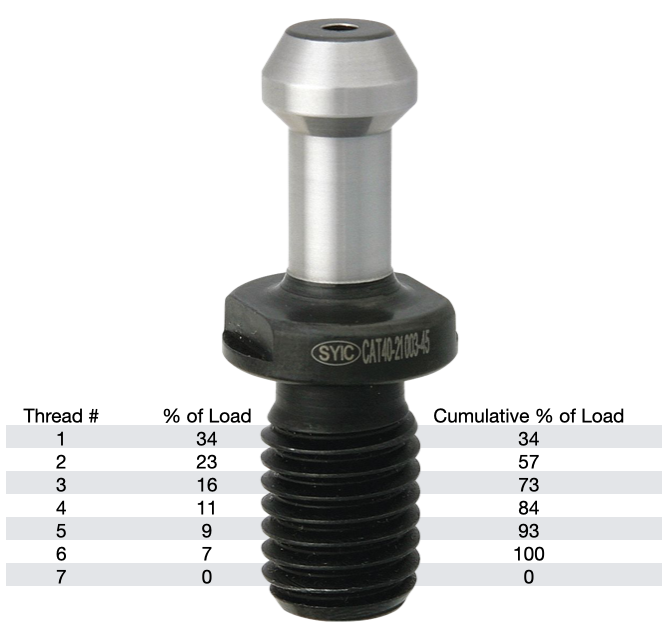
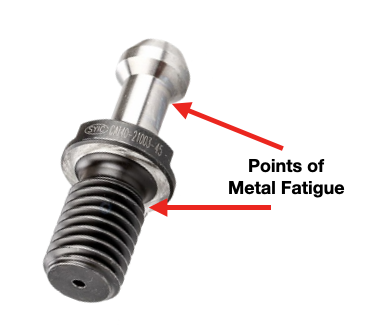
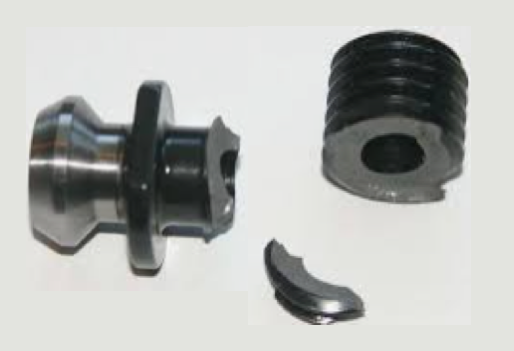
The load on each subsequent thread decreases from there, as show in the table. Any threads beyond the first six are purely cosmetic and provide no mechanical advantage. Additional threads beyond the sixth thread will not further distribute the load and will not make the connection any stronger. That is why the length of engagement of the thread on a pull stud is generally limited to approximately one to one & a half nominal diameter. After that, there is no appreciable increase in strength. Once the applied load has exceeded the first thread's capacity, it will fail and subsequently cause the remaining threads to fail in succession. RETENTION KNOB DESIGNRepetitive cycles of loading and unloading subject the retention knob to stress that can cause fatigue and cracking at weak areas of the pull stud. What are the weak areas of a standard retention knob?
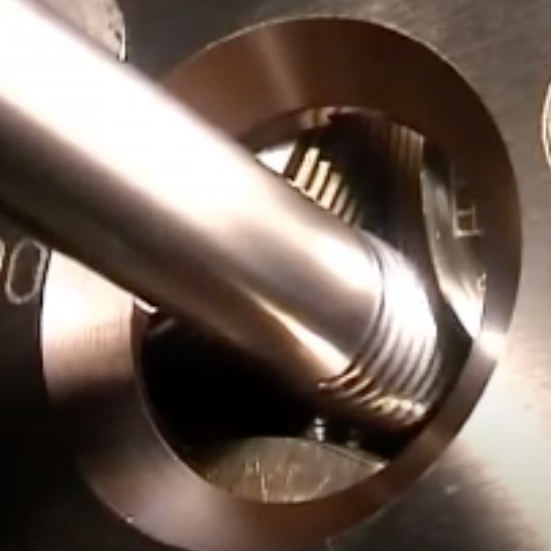
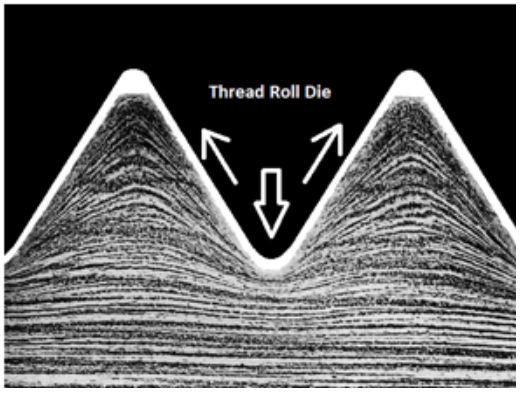
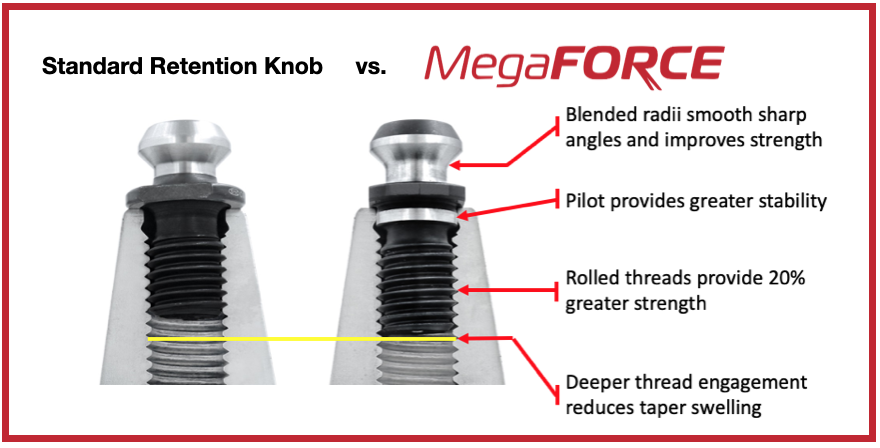
The most common failure point for a retention knob is at the top of the first thread and the underside of the pull stud where the grippers or ball bearings of the drawbar engage and draw the toolholder into the spindle. Remember, bigger Radii are stronger than sharp corners. More on that soon. MATERIALNot all retention knobs are made from the same material, however, material alone does not make for a superior retention knob. Careful attention to design and manufacturing methods must be followed to avoid introducing potential areas of failure. Techniks MegaFORCE retention knobs are made from 8620H. AISI 8620 is a hardenable chromium, molybdenum, nickel low alloy steel often used for carburizing to develop a case-hardened part. This case-hardening will result in good wear characteristics. 8620 has high hardenability, no tempering brittleness, good weldability, little tendency to form a cold crack, good maintainability, and cold strain plasticity. There are some companies making retention knobs from 9310. The main difference is the lower carbon content in the 9310. 9310 has a tad more Chromium, while 8620 has a tad more nickel. Ultimate Tensile Strength (UTS) is the force at which a material will break. The UTS of 8620H is 650 Mpa (megapascals: a measure of force). The UTS of 9310H is 820 Mpa. So, 9310H does have a UTS that is 26% greater than 8620H. That said, Techniks chose 8620 as their material of choice because of the higher nickel content. Nickel tends to work harden more readily and age harden over time which brings the core hardness higher as the pull stud gets older. The work hardening property of 8620 makes it ideally suited for cold forming of threads on the MegaFORCE retention knobs. It should be noted that some companies are using H13. H13 shares 93% of their average alloy composition in common with 9310. ROLLED THREADS VS. CUT THREADS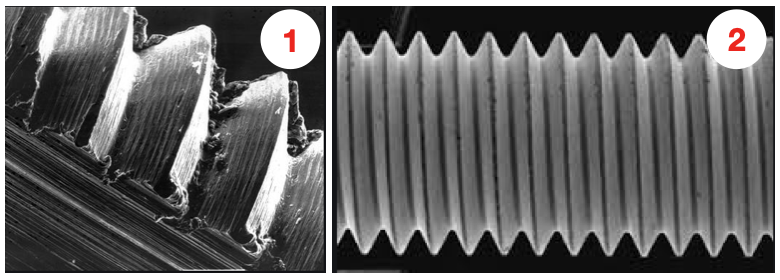 A cut thread, image 1, has a higher coefficient of friction due the the cutting process, while a roll formed thread, image 2, has a lower coefficient of friction which means that it engages deeper into the toolholder bore when subjected to the same torque. You will notice that Cutting threads tears at the material and creates small fractures that become points of weakness that can lead to failure. Rolled threads have burnished roots and crests that are smooth and absent of the fractures common in cut threads. Rolled threads produce a radiused root and crest of the thread and exhibit between a 40% and 300% increase in tensile strength over a cut thread. The Techniks MegaFORCE retention knobs feature rolled threads that improve the strength of the knob by 40%.
Also, unlike thread cutting, the grain structure of the material is displaced not removed.
By comparison, cut threads interrupt the grain flow creating weak points. MEGAFORCE GEOMETRIC DESIGNOverall Length There are some claims that a longer projection engages threads deeper in the tool holder preventing taper swelling. While a deeper thread engagement can help prevent taper swelling, applying proper torque to the retention knob is an effective way to reduce taper swelling. An over-tightened retention knob may still cause taper swelling regardless of how deep it engages the threads of the tool holder. Additionally, the longer undercut section above the threads presents a weak point in the retention knob.
Ground Pilot There is a ground pilot, underneath the flange, which provides greater stability. The pilot means the center line of the tool holder and pull stud are perfectly aligned. Magnetic Particle Tested Each Techniks MegaFORCE retention knob is magnetic particle tested to ensure material integrity and physical soundness. MegaFORCE retention knobs are tested at 2.5X the pulling forces of the drawbar.
RETENTION KNOB BEST PRACTICESIn order to maximize the life of your retention knob and prevent catastrophic failure here are some technical tips to keep your shop productive and safe.
Special thanks for Greg Webb at Techniks and Mike Roden from Fette Tools/ Turning Concepts, for providing technical insights.
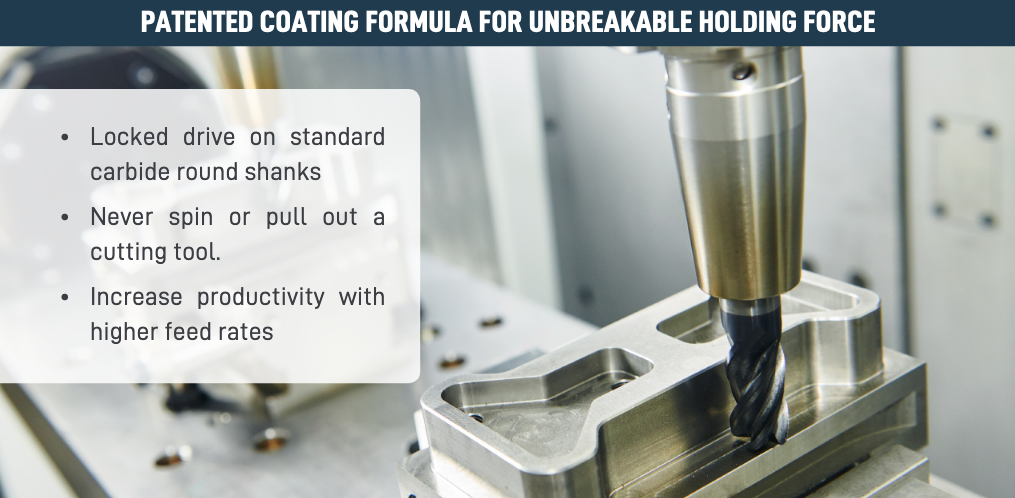
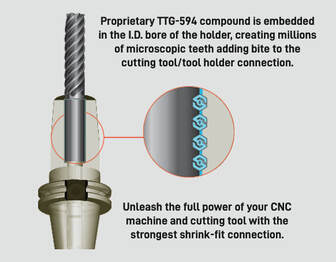
by, Bernard Martin As carbide end mills gain higher and higher speeds and metal removal rates there has also been a trend by round tool manufacturers to tighten up the tolerances on both the cutting diameter and the shank diameter to improve concentricity. At the same time, shrink fit holders have become more and more popular because they hold a tighter concentricity as well. To achieve this both the shank and the bore now have similar surface finishes and this has led to a problem The tools pull out in the cut. Shrink fit holders are the most accurate for TIR as the toolholder engages completely around round shank tools with a bore tolerance of -0.0001" to -0.0003". As high performance end mills have tightened shank tolerances to the same range of -0.0001" to -0.0003" they have used finer and finer grain grinding wheels which give the shanks a 'shiny' appearance. Shiny means that the superfinished shank has a lower coefficient of friction. So, although the TIR is tighter, the shank is more "slippery". End mills traditionally had surface finish of about 8 μin on the tool shank. But that's changed. It's been recommended that tool shanks used in shrink fit holders should not have a finish finer than 16 μin. for optimum holding power, but tell that to the guy who just superfinished the end mill to a super cocncentric tolerance that you don't want it looking that good. Everyone knows that the last thing you want is for the end mill to slip in the middle of a heavy cut or on the finishing pass of a high tolerance part. These 'hi performance' end mills, often times have higher helix angles which are great for ejecting chips but also create a higher pull out force on that slippery shank. And reducing the helix angle is not the answer. We already know that the gripping pressure is a function of the interference between the tool shank and the shrink fit toolholder bore. Most shrink fit holders have a already bore surface finish of between 12 μin. and 16 μin. So they are ground to a very high tolerance and have about the same surface finish as the toolholder shank. End mill manufacturers and machinist have tried a variety of methods over the years to stop the tools from pulling out. This has ranged from grit blasting the shank to rubbing chalk on the shank, but most everyone in the industry has felt that the problem really needs to be addressed by the longer life toolholder rather than the replaceable cutting tool. That's the problem that Techniks wanted to address. Techniks claims that their "proprietary non-slip TTG594 compound virtually fuses the tool shank with the shrink fit toolholder." ShrinkLOCKED Toolholders eliminate cutting tool pull-out and provide 4X the friction drive force compared to un-treated shrink holders. It’s not just a rougher bore finish that enhances the holding power. TTG-594 is a compound that has a much higher Brinell hardness than carbide so it can “bite” into the tool shank. But this does not affect the ability to perform tool changes.
Techniks arrived at their 4x the holding power comes from torsion testing vs. a standard shrink fit toolholder. They used a ¾” carbide gage pin in a standard holder and found the torque at which the tool will spin in the bore. They then tested the ShrinkLOCKED holder using the same test. According to Greg Webb, at Techniks, "We actually could not find the point at which the tool would spin in the ShrinkLOCKED holder as we broke the carbide gage pins at 4x+ times the torque of the standard holder. The holding power is greater, we just have not found a way to measure this, so we kept our claims conservative at 4x." We are very excited to announce that we are now able to offer on-site technical training to YOUR machinists at YOUR location! This is offered at no charge to customers who use any of the manufacturer's whom we represent in California and Nevada. However, just because you don't purchase things from us, don't feel left out! We also offer on-site topic specter training on any of the following topics for $150/hour. Each presentation lasts about 2 hours. The presentations last approximately 45-60 minutes with the remaining time for Q&A and discussion about unique applications in your facility.  Training Classes Available: Machining 101
Advanced Part Manufacturing:
by Bernard Martin We often run end mill "tests" to determine which tool performs best. Obviously, our goal is to "win' the test and get more business for our manufacturer's. This is article is about one our "tricks" and it's also why we represent both cutting tool manufacturers and rotary tool manufacturers. We want to make sure that the products work together. 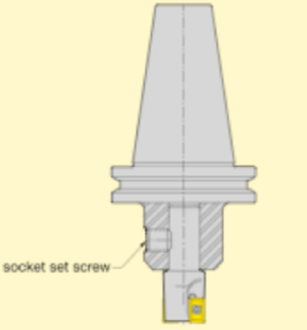 As a general rule most cutting tool & tolholder manufacturers prefer to use single angle (ER/DR style) collet chucks for general purpose cutting tool applications under 1/2" (12mm). The rules are a bit different in High Speed Machining, as there are many more things to consider, but the problems of TIR at high speeds, where you can hear and feel the chatter, are still there in general end mill cutting operations at lower RPM. It's all boils down to runout and uneven chip load.
|
Technical Support Blog
We set up this special blog for the most commonly asked questions and machinist data tables for your easy reference.
If you've got a question that's not answered here, then just send us a quick note via email or reach one of us on our CONTACTS page here on the website.
Authorship
Our technical section is written by several different people. Sometimes, it's from our team here at Next Generation Tooling & at other times it's by one of the innovative manufacturer's we represent in California and Nevada.
Archives
July 2024
June 2024
May 2024
April 2024
March 2024
February 2024
January 2024
December 2023
November 2023
October 2023
September 2023
August 2023
July 2023
June 2023
May 2023
April 2023
March 2023
February 2023
January 2023
December 2022
November 2022
October 2022
September 2022
August 2022
July 2022
June 2022
May 2022
April 2022
March 2022
February 2022
December 2021
November 2021
October 2021
September 2021
August 2021
July 2021
June 2021
May 2021
April 2021
March 2021
February 2021
January 2021
December 2020
November 2020
October 2020
September 2020
August 2020
July 2020
June 2020
May 2020
March 2020
February 2020
January 2020
September 2019
August 2019
July 2019
June 2019
May 2019
March 2019
January 2019
September 2018
June 2018
April 2018
February 2018
December 2017
November 2017
October 2017
August 2017
June 2017
April 2017
March 2017
February 2017
January 2017
December 2016
November 2016
October 2016
August 2016
March 2016
February 2016
January 2016
November 2015
August 2015
July 2015
May 2015
April 2015
March 2015
November 2014
August 2014
July 2014
December 2013
November 2013
September 2013
July 2013
March 2013
December 2012
March 2012
November 2011
May 2011
March 2011
January 2011
December 2010
November 2010
October 2010
Categories
All
5th Axis
Aerospace
Allied Machine
Aluminum Oxide
Angle Head
AT3
Balance
Bellmouthed Hole
Big Daishowa
Big EWA Automatic Boring
Big Kaiser
BIG Plus
Blue Photon
Bone Screws
Boring Tool
Carbide
Carmex Precision
CBN
Centerline Deviation
Ceramic Black
Ceramic End Mill
Ceramic Inserts
Ceramic Oxide
Ceramic Whiskered
Ceramic White
Chamfer
Champion Tool Storage
Chip Breaking
Circular Saw
Class Of Fit
CNC Lathe Tooling
Collet
Collet Chuck
Collet ER
Collet TG
Composites
Covid-19
Deep Hole Boring
Deep Hole Drilling
Drilling
Dual Contact
Dyna Contact Gage
Dyna Force Tool
Dyna Test Bar
EMO
End Mill
Exotap
Facemill
Fixturing
Fretting
Gaylee Saw
Hard Turning
Heimatec
Helical Interpolation
Hohl Shaft Kegel
How Its Made
HSK A
HSK-A
HSK E
HSK-E
HSK F
HSK-F
HXL Tap
Hy Pro Tap
Hy-Pro Tap
IMTS
Jergens
Jergens OK-Vise
Kurt
Lang
Live Tooling
MA Ford
Maintenance Cart
Mapal
Martindale Saw
Material: Aluminum
Material: CFRP
Material: D2
Material: Hastelloy
Material: Inconel
Material: Peek
Material: Stone
Material Titanium
Material: VC 10
Material: VC-10
Metric Course Thread
Metric Fine Thread
Metric Thread Chart
Microconic
Micromachining
ModLoc
Modular
Mogul Bars
MPower
NextGen Tooling
No Go Too Loose
NTK
NTK HX5
On Site Training
OptiMill-SPM
OSG Tap & Die
Oversized Thread
Parlec
PCD
PCT Firm Hold
Platinum Tooling
Projection Length
Pull Studs
Reamer
Retention Knob
Rotary Toolholders
Rotary Toolholders BT
Rotary Toolholders CAT
Rotary Toolholders HSK
Rotary Toolholders Hydraulic
Rotary Toolholders Shrink
Rough Thread
Runout
Runout Axial
Runout Radial
Safe-Flex
Saw Selection
Short Tap Life
Sialons
Silicon Nitride
Smart Damper
Speed Increaser
SpeedLoc
Speroni STP Essntia
Spindle Mouth Wear
Surface Roughness Ra
Surface Roughness RMS
Swiss
Swiss Machining
Taper Wear
Tapping Feed
Tapping; Form
Tapping IPM
Tapping: Roll
Tapping RPM
Tapping Speed
Tap Tolerance
Technical Training
Technicrafts
Techniks USA
Thread Milling
Thread Whirling
T.I.R.
Tolerance
Toolchanger Alignment
Toolholder Taper
Tool Presetter
Torn Thread
Troubleshooting
UNC Thread Size
Undersized Thread
UNF Thread Size
Unilock
Vises
Washdown Tool
Workholding
About
|
© 2024 Next Generation Tooling, LLC.
All Rights Reserved Created by Rapid Production Marketing
|



 RSS Feed
