|
It’s time for machine tool builders and machining companies to shelf the long-standing ISO 1940-1 standard in favor of ISO 16084:2017. Not only is balancing tools rarely necessary, it can also be risky. A lot of conflicting information has circulated over the years about balancing tools. As an author of the new standard for calculating permissible static and dynamic residual unbalances of rotating single tools and tool systems – ISO 16084:2017 – allow me to clear some things up and, hopefully, make life a little easier for you.
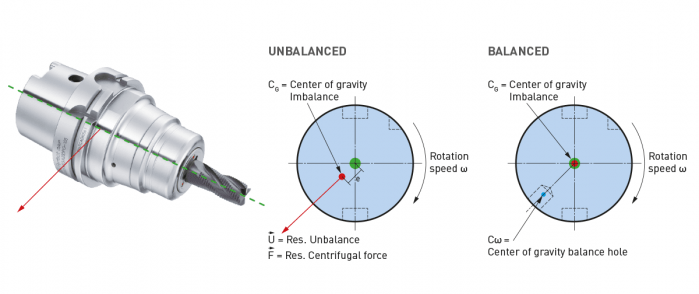
Since its institution in 1940, the G2.5 balance specification has been widely accepted across the industry; i.e., “it’s how things have always been done.” However, machines were much slower 80 years ago. Back then, the most advanced machines would have spun larger, heavier tools at a maximum speed of about 4,000 RPM. If you applied the math from those days to today, you’d get unachievable values. For example, the tolerances defined by G2.5 for tools with a mass of less than 1 pound rated for 40,000 RPM calculates to 0.2 gram millimeters (gm.mm.) of permissible unbalance and eccentricity of 0.6 micron. This isn’t within the repeatable range for any balance machine on the market. Similarly, application-specific assemblies, for operations like back boring and small, lightweight, high-speed toolholders, can’t be accurately balanced for G2.5. Machine tool builders rely on an outdated number, too, often basing spindle warranty coverage on using balanced tools at very specific close tolerances. While it’s true that poorly balanced tools run at high speeds wear a spindle faster, decently balanced tools performing common operations won’t wear spindles or tools drastically and deliver the results you’re looking for. While it’s true that poorly balanced tools run at high speeds wear a spindle faster, decently balanced tools performing common operations won’t wear spindles or tools drastically and deliver the results you’re looking for. A Little Lesson About ForcesThis all begs the question: When do you need to take the time to balance holders? I would argue that tools require balancing only if they’re notably asymmetrical or being used for high-speed fine finishing. Here’s a rule I’ve long followed: If cutting forces exceed centrifugal forces due to unbalance, high-precision balancing isn’t needed because the force required to balance the tool will most likely be less than cutting forces.
At that point, aggressive cutting – not unbalance – is going to damage the spindle. Unbalanced tools are also blamed for issues that turn out to be misunderstandings about a machine’s spindle. I’ve visited shops with new high-speed spindles that had trouble running micro tools over 15,000 RPM. They rebalanced all the tools on the advice of their machine tool supplier, but to no avail. It turned out the machine was tuned for higher torque and higher cutting forces. Before going to the effort of balancing toolholders, work with your machine builder to understand where a spindle is tuned. Not only is balancing tools rarely necessary, it can also be risky. Our inherently asymmetrical fine-boring heads are a good example. Because we balance them at the center, a neutral position of the work range, you lose that balance if you adjust out or in. To adjust, you’d typically add weight to the light side, which can be a problem for chip evacuation and an obstructor. Or you can remove weight from the heavy side, but that means you have to put some big cuts on the same axis of the insert and insert holder, ultimately weakening the tool. In longer tool assemblies, common corrections made for static unbalance can also cause issues. It happens when a toolholder is corrected for static unbalance in the wrong plane; i.e., adding or removing weight somewhere on the assembly that’s not 180 degrees across from the area where there’s a surplus or deficit. Once the tool is spun at full speed, those weights pull in opposite directions and create a couple unbalance that often worsens the situation. A Cautionary TaleIf you do go down the balancing road, you’d better know where you can modify tools, what’s inside, how deep you can go, and at what angles. Whether you’re adding or removing material on a holder, I highly recommend consulting the tool manufacturer for guidance first. As a cautionary tale, consider a customer who was attempting to balance a batch of our coolant-fed holders. Based on the balancing machine, the operator drilled ¼-inch holes at the prescribed angle into the body of the holders. Not realizing what was inside, he drilled into cross holes connecting coolant flow and ruined several holders. Tooling manufacturers are doing their part to avert disasters like this. For most, simple tools like collet chucks or hydraulic chucks are fairly easy to balance during manufacturing. We account for any asymmetrical features while machining and grinding holders and pilot each moving part, ensuring they’ll locate concentrically during assembly. These measures ensure the residual unbalance of the assemblies is very, very low and eliminate the need for balancing.
Decades of the same standards have conditioned us to think a certain way about balancing tools. While it seems logical that every tool must be balanced, it’s just not the case: Many issues attributed to unbalance aren’t caused by unbalance, and the risks of balancing every single tool often aren’t worth the reward.
Save your balancing time and resources for high-speed fine finishing. If you do have work where balance is crucial, consider how the tools you buy are balanced and piloted out of the box and/or consult your partners before making any modifications.
0 Comments
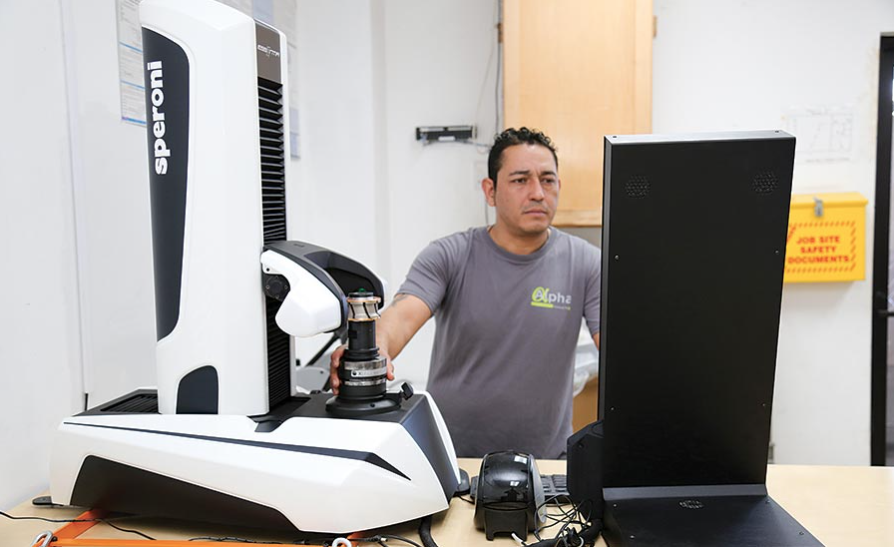
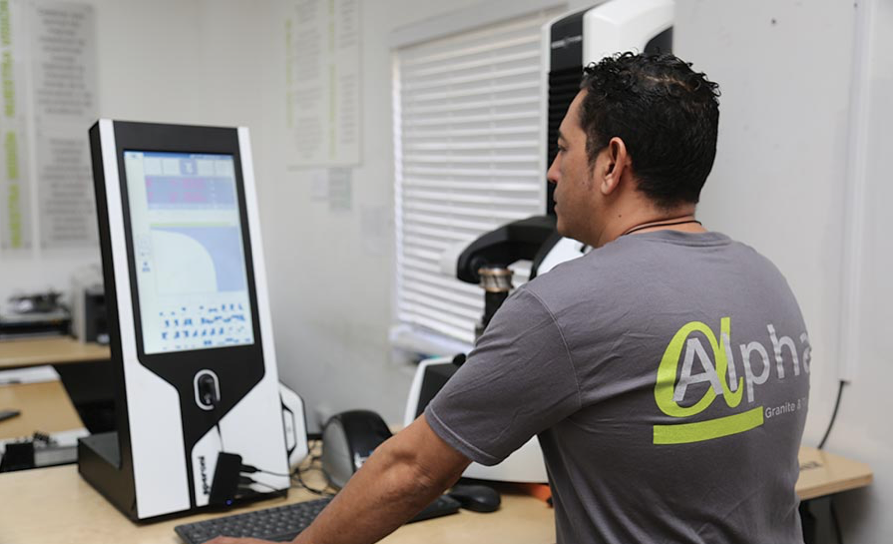
Speroni Tool Presetter: A Fabricator Finds Dramatic Time and Tool Cost Savings in an Unusual Place12/15/2020 Alpha Granite & Tile in Austin, TX, has grown steadily since its opening in 2003, adding and diversifying machinery, materials and service offerings along the way, eventually earning the title “Accredited Natural Stone Company” from the Natural Stone Institute. They’ve expanded to deliver a range of custom residential and commercial stone surfaces, from wall cladding to kitchen countertops, in more than 150 colors of granite, marble, onyx, quartz, quartzite and ultra-compact sintered surfaces. To keep up, Alpha Granite has invested in several advanced CNC machines, diminishing or altogether eliminating many of the laborious and time-consuming processes. Despite the technological advances, there was still a bottleneck that frustrated owners Denis and Sonia Phocas. “Measuring tools in the stone industry was always a very laborious process,” explained Denis Phocas. “It’s archaic. You get wet, dirty and it takes a really long time. In reality, the process destroys tools because employees know the time and effort involved, so they tend to skip the necessary measuring intervals [ultimately cutting tool life roughly in half]. Dressing of the tools is also skipped, as this process needs to be done after a set amount of linear feet of work. In essence, the tools need to be measured and sharpened at set intervals to increase life.” The traditional measuring process is manual. Measuring height and diameter to set up and inspect tools requires handheld instruments like calipers. Phocas explains how important accurate and sharp tools are to cutting stone profiles. Since each profile requires several passes by six or seven different tools, each dependent on the accuracy, and more delicate than the one before. In other words, if the first tool isn’t dialed in right, the profile shape will be deformed, tools wear faster and the hours spent preparing them are wasted. “Finding the center of one tool is hard enough,” he said. “Finding the center in relation to six others is very difficult.” Phocas had heard about tool presetters, essentially a powerful microscope with a high-resolution monitor and basic computing power. It allows for precise inspection and measurement of tool edges. The process is relatively new to the stone industry and mostly limited to larger fabricators. As he explored further, Phocas began to understand why — only the big guys could afford them. The presetters he saw from his distributers were big, expensive and, frankly, had more bells and whistles than a family-owned independent shop like Alpha Granite would need. Phocas recalled thinking, “It was such a major expense. Who needs to spend $60,000 on something you don’t need fully automated? There had to be a smaller solution.” Phocas approached suppliers about entry-level options, but they continued pushing more expensive options. He got creative and found a metalworking supplier, Big Kaiser Precision Tooling in Hoffman Estates, IL, that might be able to help. The Speroni STP Essentia they offered featured a compact bench-top design, could work with any brand of router tools and handle the more complex tool profiles in stone cutting with ease. Most importantly, it was much less expensive than the other options he had found. After working closely with a representative from Big Kaiser, even trying out an Essentia in his shop, Phocas was convinced and decided to purchase one. While there are significantly fewer types of tools used for profile cutting, this new capability and process would be an adjustment at first, starting with installation. “I had never worked with one of these,” said Phocas. “It’s a precision tool. I wouldn’t call it daunting, but the process was interesting. We installed it in the workshop manager’s office because we wanted to keep it in a clean environment and because it’s got a computer hooked up to it. In the end, the installation process was pretty straightforward.” To shrink the learning curve for his team, Phocas worked with Big Kaiser to develop a simple calibration manual. In just 18 pages, they were able to include step-by-step instructions for using the touchscreen system and measuring their 11 most common tools, from simple drillers to ogees.
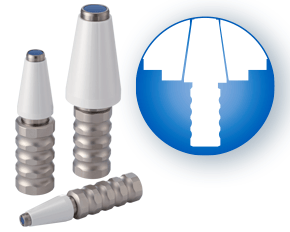
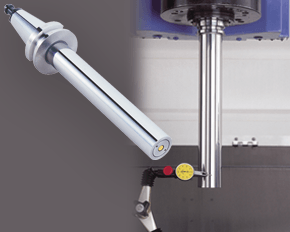
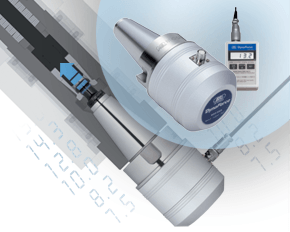
“Once we got used to it, it was very easy,” said Phocas. “Our employees simply love the Essentia and now depend on it.” The results have been undeniable. “The Essentia quickly tells you if a tool is out of shape,” explained Phocas. “I can prepare a set of tools in about 10 minutes, put them on the machine and start running. Whereas, with the old system it would take me anywhere between two to three hours, re-measuring and re-dressing while machines sat idle. We think our tool life has improved by 35 to 45 percent as well. It’s just phenomenal.” Alpha Granite isn’t stopping there. In the near future, they’ll install software on their CNC routers that will precisely monitor the amount of linear feet each tool is working. This data will make tool recalibration even more streamlined. As things stand now, they have scheduled days for using the Essentia to recalibrate tools. With the new software, they’ll be able to recalibrate on-demand, so to speak, right when a tool has reached its manufacturer-recommended linear feet. The addition of the Essentia has sparked dramatic process improvements. While presetters aren’t foreign to stonework, they aren’t all that common at fabrication shops like Alpha Granite. But if the results are any indication, other independent fabricators may want to get creative in their exploration of tool management options too. The full story about Alpha Granite & Tile can be found in the April 2018 issue of Stone World or online at: www.stoneworld.com. A machine’s spindle is one of the key links in the machining chain. In other words, if there are irregularities inside or at the face, they can show up on your part. It makes regular inspection and spindle maintenance critical to getting the most out of your equipment and maintain process efficiency. These three accessories, the Dyna Contact Taper Gage, the Dyna Test Bar and the Dyna Force Measurement Tool, can help you perform this maintenance easily without eating into valuable spindle time. Dyna Contact Taper Gage
Dyna Test Bar
With the help of a dial indicator, you can uncover any runout while safely spinning the spindle at a very low RPM and verify the parallelism of Z-axis motion. Dyna Force Measurement Tool
The Dyna Force measurement tool provides a precise digital reading that reveals reduction in retention force in increments of 0.1kN. If you would like a demonstration for any of these tools contact us or set up an appointment for one of our Next Generation Tooling engineers to visit you!
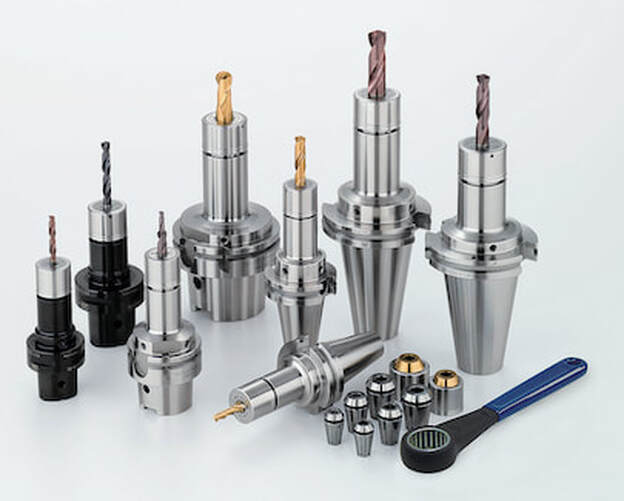
A guest blog from BIG KAISER. High-speed machining started getting popular in the ‘90s, especially in aerospace where they replaced fabricating processes with machining monolithic parts like wing struts from billets. Machine tools capable of spinning cutting tools at tens of thousands of RPM made it easier to produce these parts quickly. Like machines, holders adapted. The centrifugal forces they had to manage in order to keep tools cutting correctly became extreme. The toolholding systems available at that time were found not to be as effective as the shallower 1-to-10 taper ratio of the German hollow taper shank, hohl shaft kegel (HSK) in German. The HSK has since been standardized to ISO specifications (12164-1, -2). HSK is now available in several sizes and forms to fit with small to large machines. For the most part, the market has settled on the form A for general milling. It has been adopted in Japan, North America and Europe and is truly one of the only worldwide-side toolholder standards. Form E or F is for high-speed machining. The forms have different features depending on the standard they follow. In the end, to achieve efficient tool life, proper finish and productivity in high-speed work, holders need to be as rigid, compact and short as possible to keep the whole assembly stable. What to know when choosing a high-speed tool holder
When it comes to balancing holders, the quality G2.5 is widely used in the industry and is described in the ISO 1940-1 (issued in 2003) standard. However, this quality class is often over-specified and is in many cases not economically or technically feasible, especially when applied to smaller and lighter tools. Standards often applied to tools are more suited for rigid rotors and are practical in a broader use for balancing.
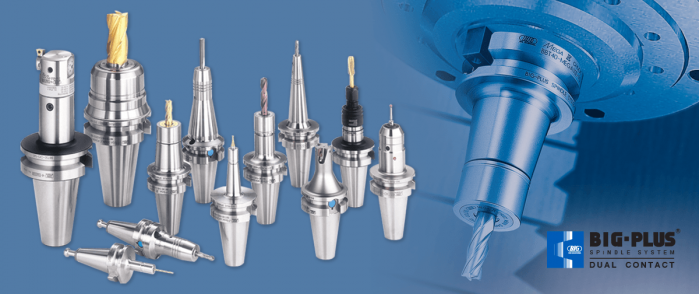
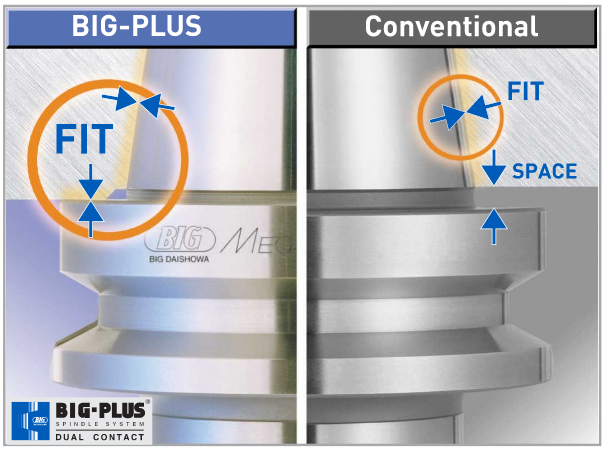
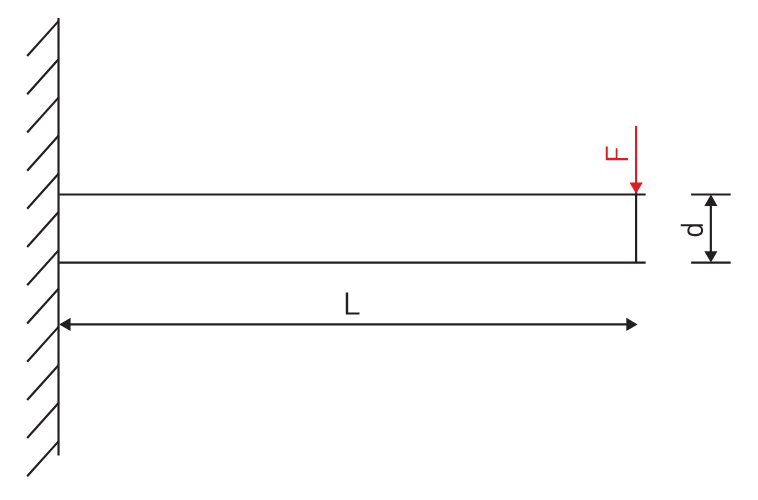
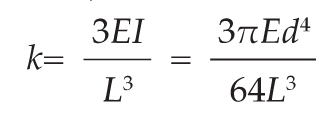
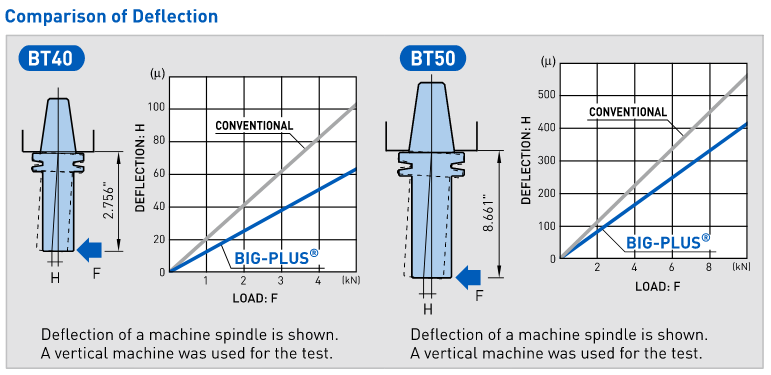
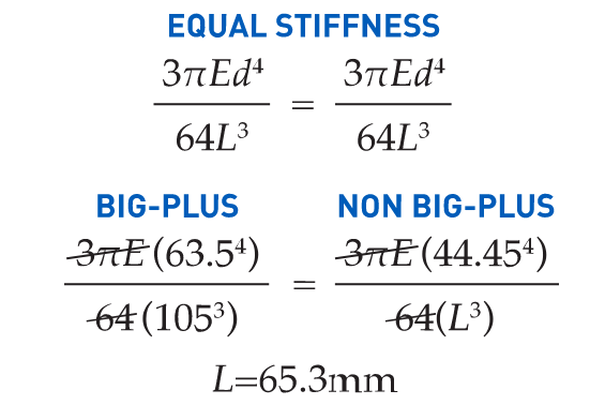
However, it cannot be applied to a complete system of spindles, tool holders and tools adequately and within technical constraints. For example, a tool to be compliant will have to be balanced to less than 1 gmm/kg at a speed of 25,000 rpm, which in turn corresponds to a mass eccentricity of less than 1 μm. This allowable tolerance is less than the interchange accuracy for even HSK, essentially negating all the costs and time for balancing the tool to such a strict tolerance. For this reason, all BIG KAISER tool holders are balanced according ISO 16084 (issued in 2017) specifically developed for rotating tool systems. ISO 16084 focuses on the interaction between spindle and tool factoring in the allowable load on the spindle bearings generated by the tool’s imbalance. This load must not exceed one percent of the dynamic load capacity of the spindle bearings. According to ISO 16084, the allowable unbalance tolerance is specified in [gmm] and is not expressed using a special quality grade [G]. In conclusion, BIG KAISER does not indicate any G-values for balancing quality, but rather the maximum rotational speeds of the individual tool holder. The BIG Kiaser MEGA holder program includes a variety of styles that can be used up to 40,000 RPM. They guarantee 100 percent concentricity and runout accuracy down to .00004" at the nose. They are built specifically to withstand speed and forces required in today’s high-throughput environment. For more information on BIG KAISER's approach to balancing tool holders, click here. To learn more about our high-performance tool holders here. Spindles and tool holders are in a constant battle with the forces of nature, with this battle becoming more and more difficult with heavier cuts and longer projections. Chattering and deflection have always been the bane of machinists’ existence, so much so that the sight of a long and slender toolholder will immediately cause goosebumps. If you understand why a long tool holder behaves the way it does, you’ll know that there are ways to fight back against this bending. Every machinist knows that short and stubby holders are more resistant to deflection than long and slender holders. You’ve also probably heard that, if possible, you’ll want most of your cutting forces to be axial rather than radial. Not only does this fight chatter in operations like boring, but your spindle also is better equipped to handle loads in this axis. However, these options aren’t always going to be on the table, especially in unavoidable long-reach situations and many milling operations. In this constant battle with tool deflection, much time and effort has been spent designing shorter holders, stiffer tools, and clever anti-vibration geometry and materials. But oftentimes, the body diameter(s) of the holder can be overlooked as a means of increasing rigidity, especially in situations where it is all you have to work with. This is a serious shame, as you’ll soon discover. The concept of dual-contact technology has been around for years, existing in many different forms but always with the same goal of capitalizing on this untapped potential of rigidity. For those who don’t know, dual contact refers to the shank contacting the spindle taper and the spindle face simultaneously. Oftentimes, the solution involved ex post facto alterations to the spindle or tool holder, such as using ground spacers or shims to close the gap, for example. In other words, there was no standard solution, and if you wanted dual contact, you would have to be prepared to spend time and money either buying modified tool holders or modifying them yourself to adapt them to your spindle. BIG-PLUS emerged as a solution to this issue. Essentially, both the spindle and tool holder were ground to precise specifications so that they closed the gap between spindle face and flange in unison (while depending on very small elastic deformation in the spindle). What this meant is that operators were able to confidently switch BIG-PLUS tooling in and out of a BIG-PLUS spindle and achieve guaranteed dual contact. Not only that, but standard tooling could still be used in a BIG-PLUS spindle if necessary, and vice versa. Though not technically an international standard, it’s been adopted by many machine tool builders because of the clear performance improvements and simplicity. In fact, BIG-PLUS spindles come standard on more machines than you would think. We often come across operators that have machines with BIG-PLUS spindles and don’t even realize it. How exactly does dual contact help with tool rigidity? The torque (or moment) exerted by the cutting forces is maximized at the point where the holder and spindle meet, the base of the tool holder. With standard CAT40 tool holders, this would be the gage line diameter. When the holder contacts the spindle face via BIG-PLUS, the effective diameter would be the larger diameter of the v-flange, since this is the new anchoring point of the holder and spindle. So, you are beefing up the diameter at the point where the reactionary force is greatest. It’s not too much of a leap to conclude that a larger effective diameter will give you more rigidity. That being said, you may still be asking yourself: does such a seemingly small increase in diameter really make a difference? To understand the effect of BIG-PLUS, you must understand the physics behind it. Imagine a simple scenario in which a tool holder is represented by a cylindrical bar that is fixed at one end and free-floating at the other. In other words, a cantilever beam. If you think about it, this is essentially what a tool holder becomes once it’s secure in the spindle. Now, let’s introduce a radial force F that acts downward at the suspended end of the bar, which represents a cutting force you would encounter when milling or boring, for example. The bar, as you might expect, will want to bend downward. It’s similar to how a diving board bends when someone stands at the end, though less exaggerated. It’s possible to predict the amount of deflection (or inversely, bending stiffness) at the end of this hypothetical bar if you know its length, diameter and material. The expression below represents the stiffness k at the end of the bar where d=diameter, L=Length and E=Modulus of Elasticity I won’t ask you to do any math here, I just want you to look at the equation. We can see that increasing d will increase the value of k, while increasing L will decrease the value of k, since it’s in the denominator of the equation. This certainly makes sense if you think about it: a short and squat bar (large d, small L) will be more rigid than a long and slender bar (small d, large L). Something interesting to note is that d is raised to the 4th power, while L is only raised to the 3rd power. Diameter affects rigidity an entire order of magnitude more than the length does. This is where the power of BIG-PLUS comes from and is why a small increase in diameter can have such a powerful effect on performance. 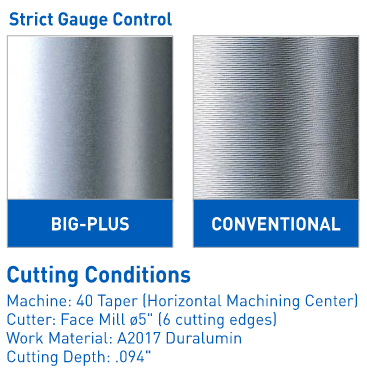 For a CAT40 tool holder, the gage line diameter is Ø44.45 mm and the flange diameter is Ø63.5 mm. Let’s imagine two bars of identical length and material, so L and E remain unchanged. One bar has a diameter of Ø44.45 mm (standard CAT40) and the other has Ø63.5 mm (BIG-PLUS CAT40). If you were to plug these values into the above equation for comparison, you would find that the BIG-PLUS holder results in a k value that is around 4 times greater than the standard bar. Based on this comparison, you could say that a BIG-PLUS holder is 4 times as rigid as an identical standard CAT40 holder, because it is 4 times as resistant to deflection. Think of the tool life and surface finish improvements you would see with a tool that is 4 times more rigid, not to mention the reduction in fretting and potential for reduced cycle time. You would get similar results if you were to make the same comparison for CAT50, BT40, BT30, etc. If you’re still not convinced, we can also compare the rigidity in this way: Let’s say there is a Ø63.5 mm BIG-PLUS CAT40 bar of some arbitrary length. One of our more common gage lengths is 105 mm, or just over 4 inches, so let’s use it as an example. You’re probably wondering, at what length would a comparable standard CAT40 holder have an equal stiffness? If we take our stiffness expression and set it equal to itself (one side representing BIG-PLUS, the other non BIG-PLUS), we can plug in this BIG-PLUS holder length and our known diameters to find our unknown non-BIG PLUS length: What does this mean? A BIG-PLUS holder of around 4 inches or 105 mm in length will have equal rigidity to a standard CAT40 holder of around 2.5 inches or 65 mm in length. Any experienced machinist will know quite well the difference in rigidity between a 4-inch long holder and a 2.5-inch long holder.
If this is true, we can say that implementing BIG-PLUS is equivalent to a 40% reduction in length in terms of rigidity. Theoretically, a BIG-PLUS tool holder will behave like a standard tool holder that is nearly half of its length! Obviously, we’ve used simple and idealized cases here to represent the complicated and dynamic world of metal cutting. Tool holders, of course, don’t have uniform body diameters or materials and the cutting forces usually aren’t acting in one direction in a constant and predictable way. If our holder necks up and down to different body diameters along its length, which is realistically what happens, each of these sections would be its own microcosm of “beam” that would influence the overall behavior (at that point, finite element analysis on a computer becomes the only practical way to predict behavior). So, will the advantage of BIG-PLUS really be as dramatic as our hand-calculated classical beam theory suggests? Probably not, but it depends on the tool holder/tool. Most cases will follow our simple model quite closely in practice; others not so much. If nothing else, we’ve demonstrated how dramatically the flange contact of BIG-PLUS can influence rigidity, at least in a purely mathematical sense. As if you needed any more reasons to be on the BIG-PLUS bandwagon besides increased rigidity, you will also eliminate Z-axis movement at high speeds, improve ATC repeatability and decrease fretting. This means that you will take heavier cuts, scrap less parts, and increase tool and spindle life. BIG-PLUS isn’t a new idea by any means, but with a proven track record of tackling tough jobs, it’s hard to imagine working in a modern machine shop and not taking advantage of what it has to offer. If you’re still not convinced, we can also compare the rigidity in this way: Let’s say there is a Ø63.5 mm BIG-PLUS CAT40 bar of some arbitrary length. One of our more common gage lengths is 105 mm, or just over 4 inches, so let’s use it as an example. You’re probably wondering, at what length would a comparable standard CAT40 holder have an equal stiffness? If we take our stiffness expression and set it equal to itself (one side representing BIG-PLUS, the other non BIG-PLUS), we can plug in this BIG-PLUS holder length and our known diameters to find our unknown non-BIG PLUS length: Shrink-fit and hydraulic holders are both useful in low clearance, tight work envelopes found in moldmaking and multi-axis machining applications. When deciding which one to use, their differences will guide your choice. Here are some of the fundamental contrasts to help you decide which holder type is best for your work. 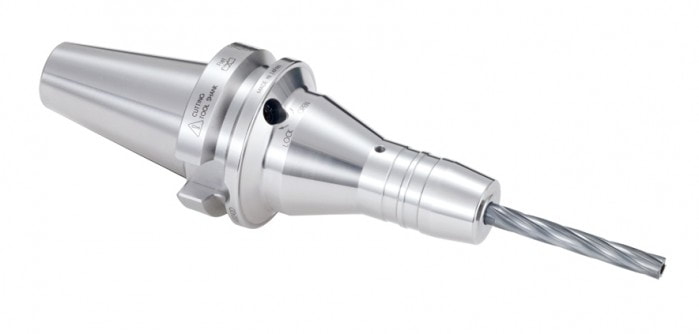 Hydraulic holders (shown here) and shrink-fit holders share a middle-of-the-road gripping strength: about half that of a milling chuck and about double that of collet chucks. The superior vibration control of hydraulic chucks makes them good choices for finish milling, reaming and drilling work. While they may not be as precise, the rigidity of shrink-fit holders makes them effective in moderate to heavy milling work where clearance is an issue, and in many high speed scenarios. Shrink-fit and hydraulic holders are especially useful in low clearance, tight work envelopes because of their relatively slim design. This has made them effective in moldmaking applications and more coveted since the widespread adoption of multi-axis machinery. Hydraulic and shrink-fit holders also share a middle-of-the-road gripping strength: about half that of a milling chuck and about double that of collet chucks. These similarities are why we’re taking the time to compare the two. When it comes to deciding between one or the other, it’s the differences that will guide the choice. So let’s dig into some of the fundamental contrasts that may help you decide which holder type is best for you and your work. Initial InvestmentWhen it comes to the holders themselves, shrink-fit is generally a slightly lower cost. The delicate hydraulic clamping systems built into the holders add cost when compared to the simple and solid bodies of shrink-fit holders. Where the major difference lies is in the equipment needed to heat the shrink-fit holders. When heated to the proper temperature, the resulting growth of the ID allows the tool to be slipped into the bore. Once cooled, the holder expands, gripping the tool. This process, especially the induction heating, involves cost. Shrink-fit heating systems start at around $5,000 and go up from there. They also require fairly significant power, adding a slight ongoing expense. MaintenanceIf you want to see a full return on your shrink-fit investment and then some, maintenance is critical. When dealing with temperatures that can approach 600 deg F, the stakes are heightened. This is why we recommend using dry cutting tools without oil on them. From there, diligent attention must be paid to the cleanliness of holder bores and tool shanks. Any contamination will be baked onto the metal and progressively deteriorate performance. When it comes to hydraulic chucks, maintenance is straightforward as long as the hydraulic chamber stays sealed. To ensure the hydraulic system performs consistently, we recommend using test pins to gauge its force over time. Training, Handling and Safety Hydraulic chucks are infinitely simple. A turn of a wrench locks the tool in place. When it comes to shrink-fit systems, there are a few more factors to consider when getting the team up to speed, including safety considerations. Aside from the operators who handle the tooling and heating system directly, others on the floor need to be made aware of the risk of burns. Heating stations are usually benchtop arrangements because of the power requirements. This means hot metal will need to be transported across the floor in one form or another. Another training consideration is that tools can be overcooked, so to speak. This will cause permanent damage that harms performance. Operators must understand, know how to prevent and diagnose this. SetupAs mentioned earlier, hydraulic chucks use a simple wrench to lock in the tool. Tools can also be swapped at the machine or offline. When it comes to shrink-fit setups, they must be done exclusively offline where the heating and cooling can be powered. Most heating cycles can be as fast as 15 seconds. Cooling can take several minutes, even with assistance like air. Having extra compatible holders is a viable solution to speed concerns, if you’re comfortable with the additional investment. All that being said, there are significant time-saving opportunities to be found setting up tools offline. We believe strongly in tool measuring systems and recommend offline setup when and where applicable. VibrationHydraulic chucks have two specific advantages in terms of vibration and accuracy. The first is that shrink-fit tools and holders are dependent on the heating and cooling processes being consistent. This brings us back to the maintenance section above; the slightest imperfection in the holder bore, not to mention the natural inconsistencies in the heating and cooling processes, can be multiplied at the cutting edge in the form of vibration or runout. There is also the chance of some variation from operator to operator. Hydraulic chucks are less reliant on these variables and their production is imminently consistent. Once a master bore is established during manufacturing and assembly, it’s a repeatable process over thousands of cycles. This translates to consistent clamping tolerances and forces over the life of the holder. The second advantage is the natural damping characteristics that hydraulics provide. That’s not to say shrink-fit holders are ineffective in terms of vibration management. Their runout is five times better than side-lock holders. Roughing and FinishingThat brings us to some application talk. While they may not be as precise, shrink-fit holders’ rigidity makes them effective in moderate to heavy milling work where clearance is an issue, and in many high speed scenarios. The superior vibration control of hydraulic chucks makes them good choices for finish milling, reaming and drilling work. Roughing and FinishingUp to this point, you may think I’m an advocate of hydraulic chucks over shrink-fit holders, but that’s not the case. We offer both products. In fact, shrink-fit holders are fundamentally the perfect tool holder. From an engineering perspective, there are no moving parts, no additional components, they use the properties of the holder itself to grip the tool and they’re symmetrically round. But as we all know, a manufacturing floor is not a perfect environment. Variables must be considered when choosing equipment.
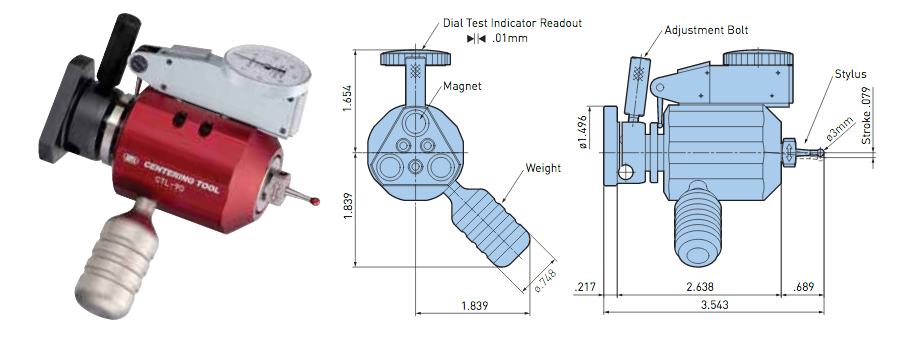
Should the choice between hydraulic chucks and shrink-fit holders come up, the factors discussed here will help guide your choice. With this innovative centering tool from Big Kaiser, spindles and tools can be centered quickly and easily. It's ideal for limited spaces within small lathes. The Centering Tool is a static dial gauge for easy centering.
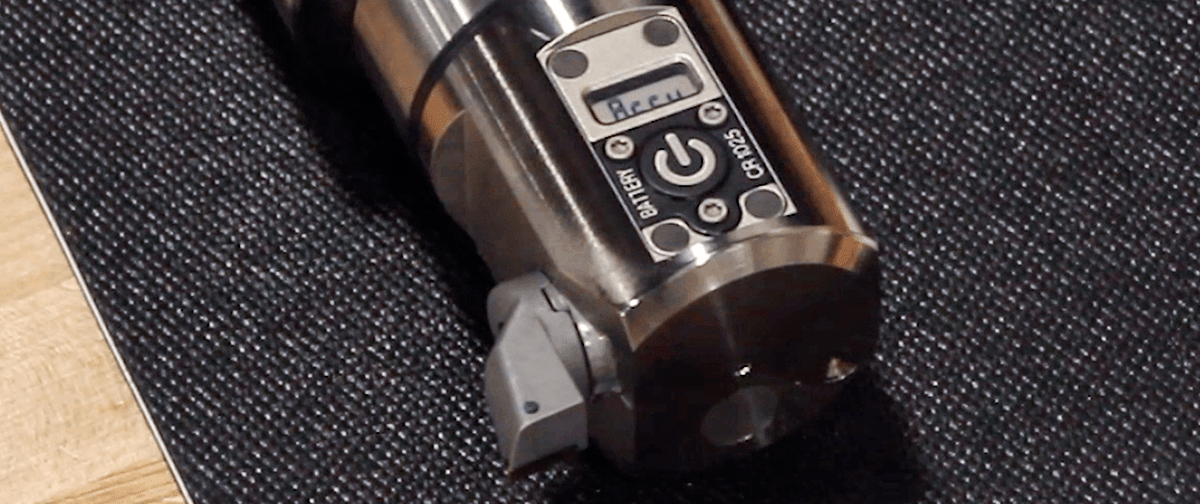
Accu is the message that is displayed when the battery needs to be changed.
This message does not mean there is an error or accuracy malfunction with the boring head. The head should still continue to function for a few more adjustments. If this message appears on the EWE heads, the wireless connectivity to the App and history functions are deactivated until the battery is replaced. |
Technical Support BlogAt Next Generation Tool we often run into many of the same technical questions from different customers. This section should answer many of your most common questions.
We set up this special blog for the most commonly asked questions and machinist data tables for your easy reference. If you've got a question that's not answered here, then just send us a quick note via email or reach one of us on our CONTACTS page here on the website. AuthorshipOur technical section is written by several different people. Sometimes, it's from our team here at Next Generation Tooling & at other times it's by one of the innovative manufacturer's we represent in California and Nevada. Archives
March 2024
Categories
All
|
About
|
© 2024 Next Generation Tooling, LLC.
All Rights Reserved Created by Rapid Production Marketing
|

 RSS Feed
